In the dynamic real estate landscape of Vancouver, prospective buyers are often presented with a choice between two distinct forms of ownership: Co-op and Strata. Each offers its own set of advantages and considerations, making it essential for buyers to understand the differences between the two before making a decision. Let’s delve into the nuances of Co-op and Strata ownership to help you navigate this important aspect of the homebuying process.
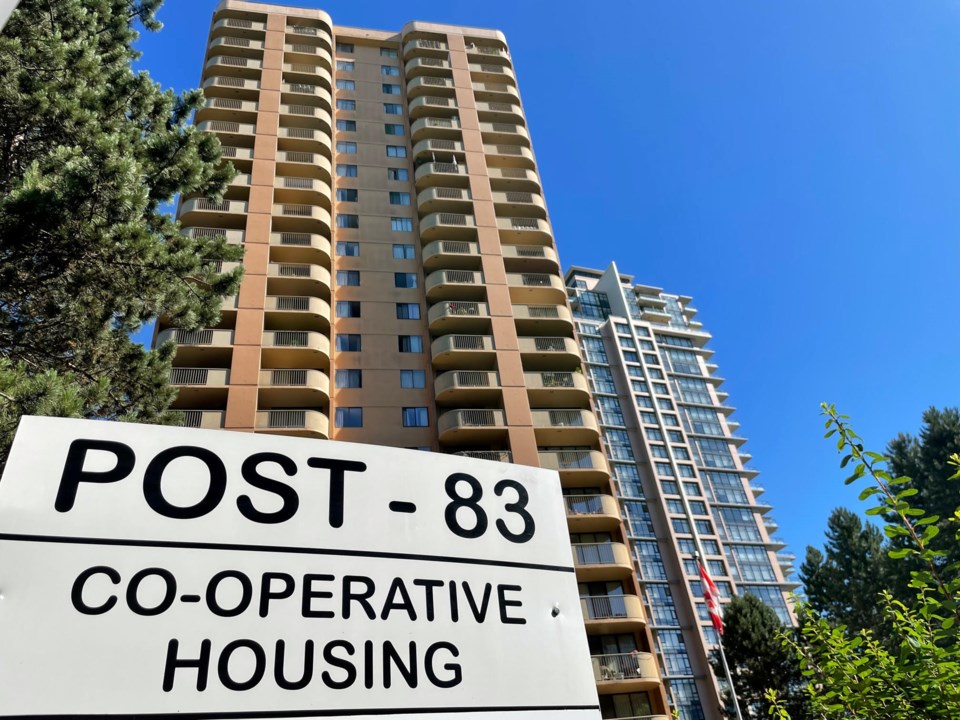
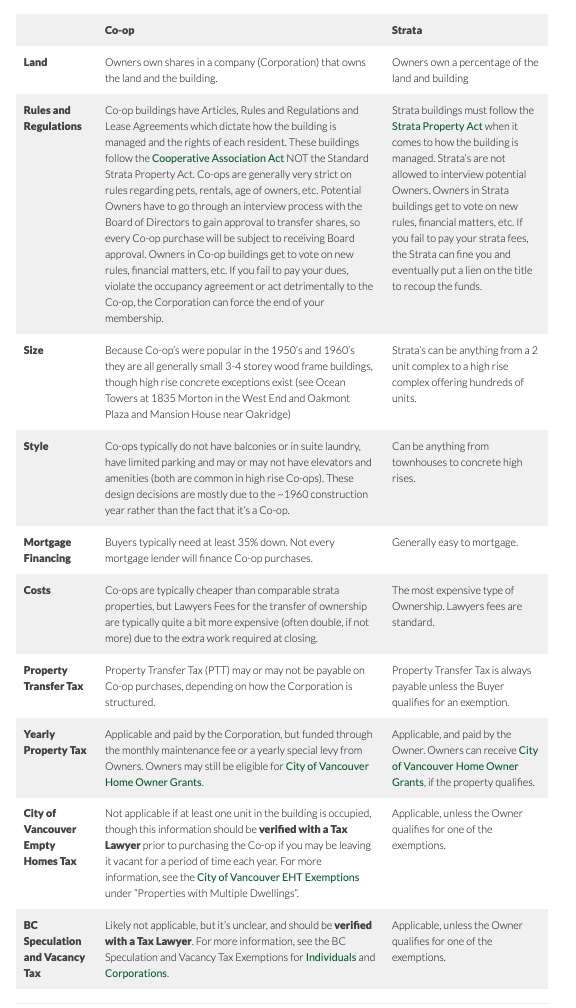
A Brief History: The roots of Strata ownership in British Columbia can be traced back to 1966 when the Strata Title Act was introduced. This legislation revolutionized property ownership by allowing for the subdivision of buildings into separate units, each with individual ownership rights. Before this, Co-op ownership, short for Cooperative Housing Corporation, was the predominant model. Co-op ownership involves shareholders collectively owning a building and the land it sits on, with each shareholder holding shares associated with a specific unit.
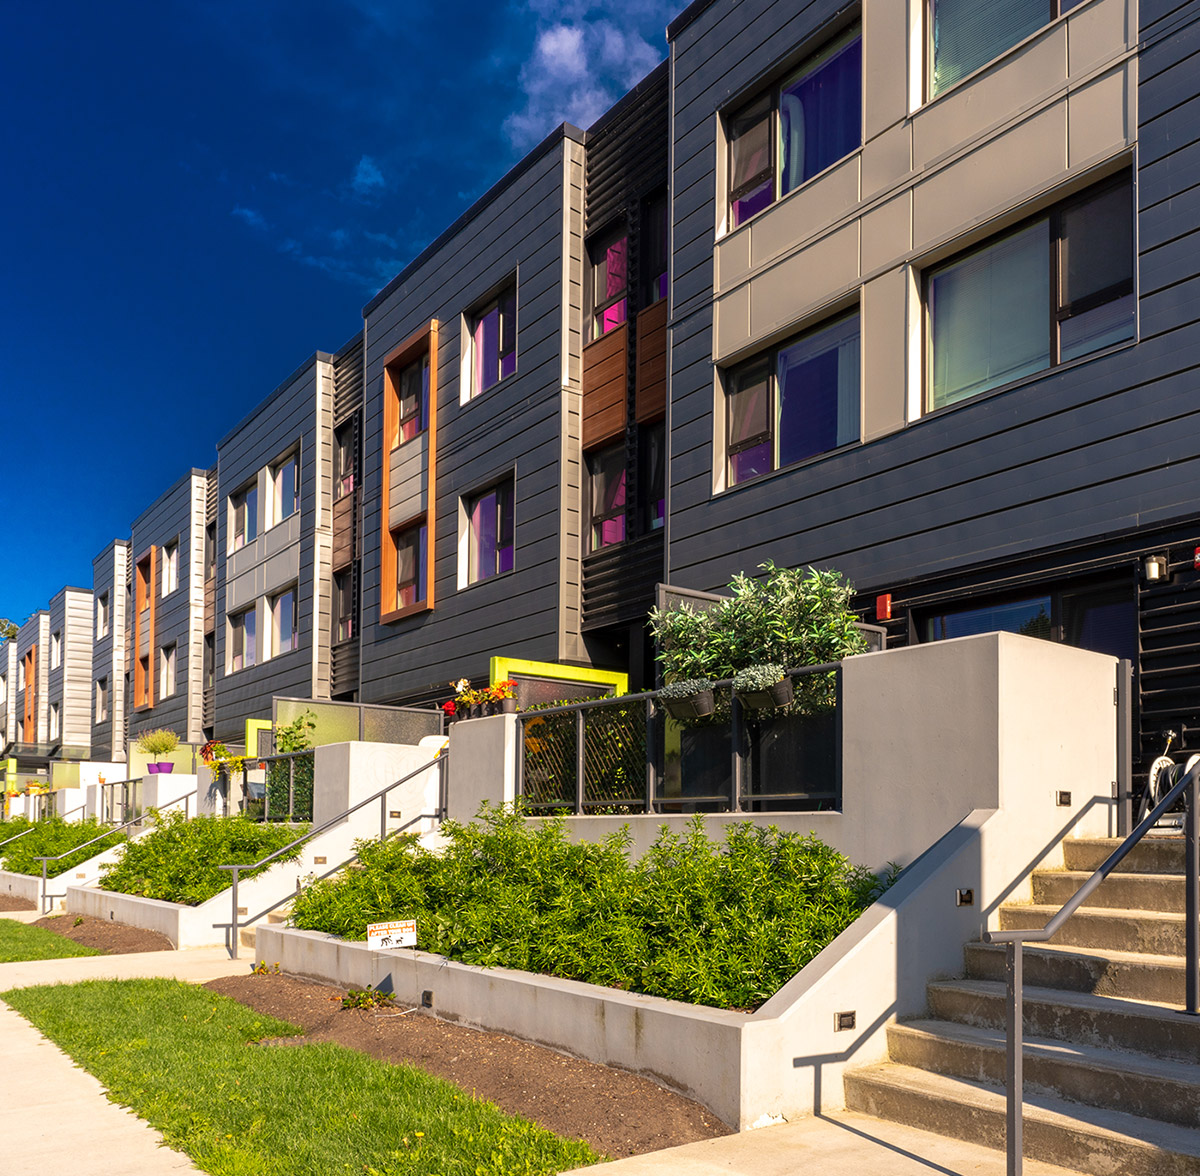
Understanding Strata Ownership: In a Strata development, the building is divided into separate units known as strata lots, allowing for individual ownership. Alongside the strata lot, owners also have a share of the common property, known as unit entitlement, which is proportional to the size of their unit. Strata ownership typically involves a strata council responsible for managing the common areas and enforcing bylaws.
Exploring Co-op Ownership: Co-op ownership, on the other hand, involves buyers becoming shareholders in a Cooperative Housing Corporation that owns the building and land. Shareholders hold shares corresponding to their unit and participate in decision-making through general meetings and elected boards of directors. Co-op properties can offer a more affordable alternative to Strata ownership, with some Co-ops having restrictions on pets, rentals, and age requirements.
Location and Suitability: Co-op buildings are predominantly found in areas like the West End, Oakridge, Fairview, Kitsilano, and Kerrisdale. They can be particularly attractive to downsizers seeking a secure and cost-effective housing option or parents looking to purchase a stable home for family members. Despite the potential for lower costs, Co-op ownership may require a significant down payment, often around 35%, which can pose a challenge for some buyers.
Conclusion: Both Co-op and Strata ownership offer unique benefits and considerations for buyers in Vancouver. While Strata ownership provides individual control over units within a shared building, Co-op ownership offers a sense of community and collective decision-making. Understanding the intricacies of each ownership model is crucial for making an informed decision that aligns with your lifestyle and financial goals.
As you embark on your homebuying journey in Vancouver, consider reaching out to us to help you navigate through the nuances of Co-op and Strata ownership, helping you find the perfect fit for your needs and preferences.
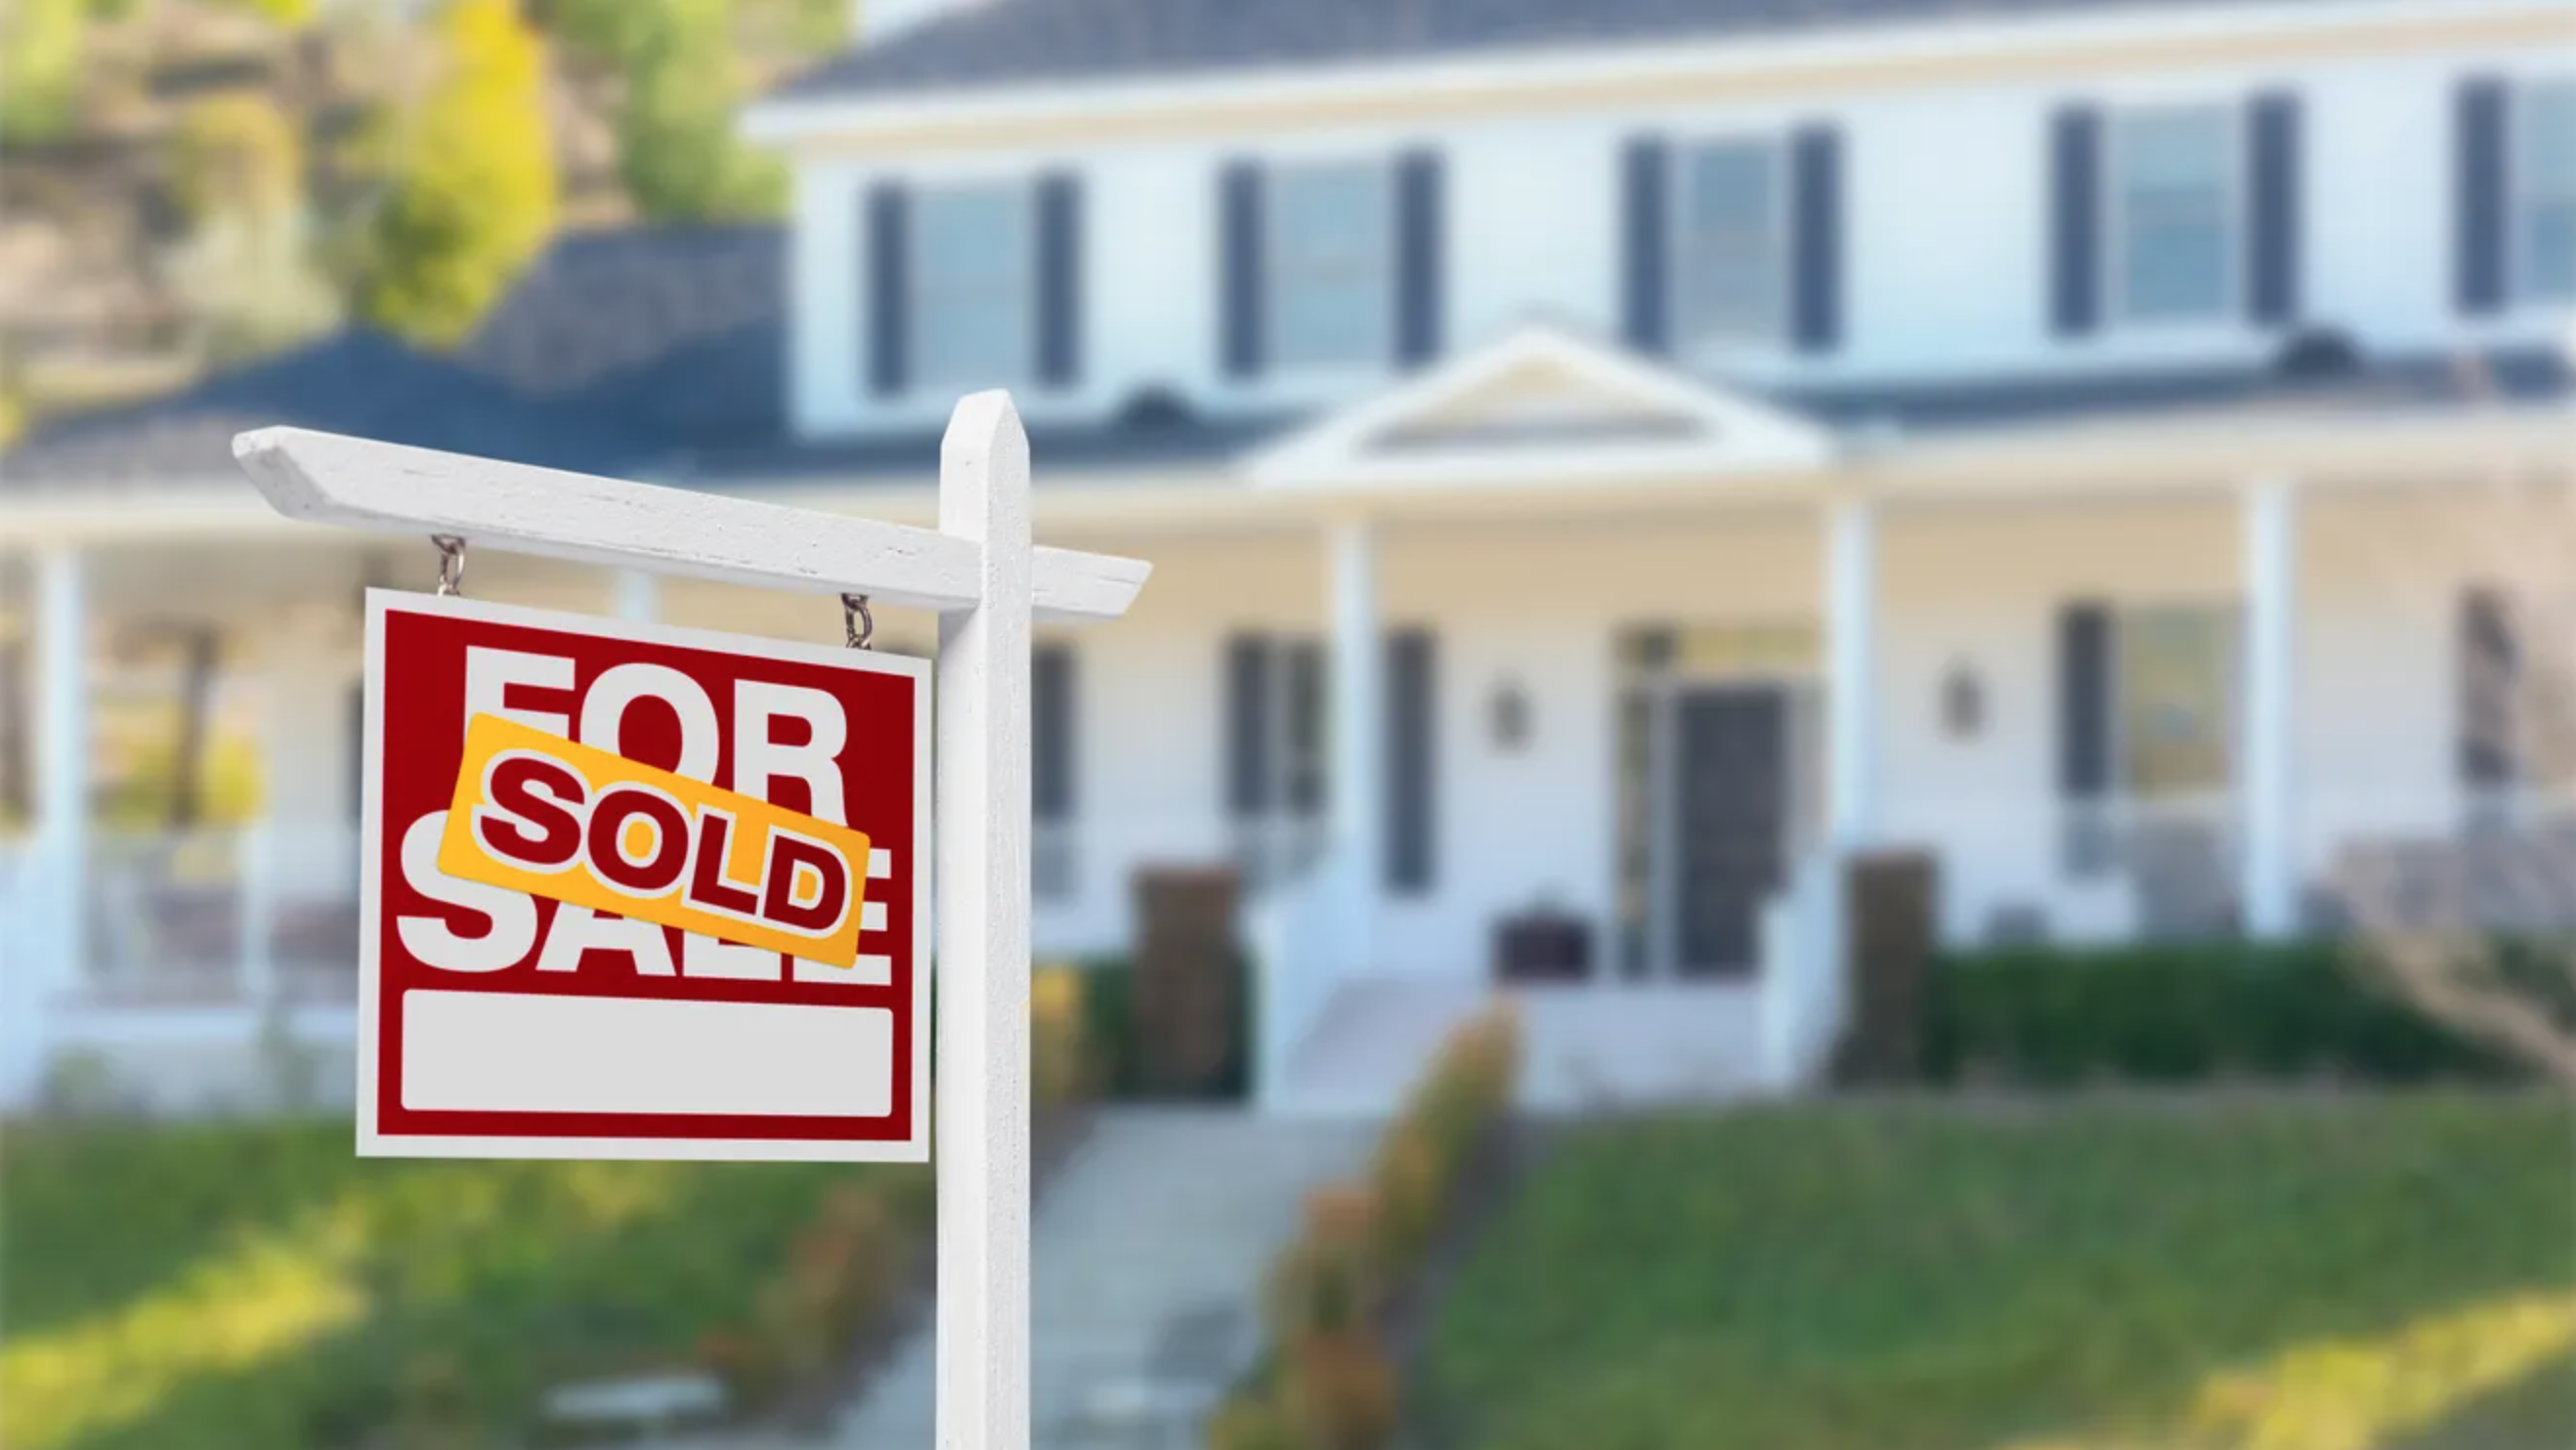
When you’re preparing to sell your home, it’s essential to be aware of the various expenses associated with the process. Here’s a breakdown of the key costs you might encounter:
Legal Assistance: Lawyer Fees When engaging in property transactions, a professional lawyer is crucial to ensure a smooth process. Your lawyer will handle tasks such as discharging the title and mortgage, verifying prepaid expenses, clearing utilities, and managing the transfer of ownership to the new buyer. Typically, you can expect to invest between $700 and $1,500 for these legal services.
Real Estate Services: Agent Fees If you choose to work with a real estate agent, be mindful of the associated commissions. A Seller working with a Realtor covers commission for both Seller & Buyer agents. Even if you opt for a discount listing or sell by owner (FSBO), you may still incur expenses, especially when offering a commission to the buyer’s agent. Consider your time and expertise when deciding whether to enlist professional help.
If you hire an agent, other than listing the property on MLS (and multiple other Online platforms) they handle various marketing expenses, including professional photoshoots, filming, 3D Matterport tours, Google & Facebook ads, ordering 2 years of strata documents, and more.
The commission rate is usually 7% on the first $100,000 & 3% on the remaining balance. For a $1,000,000 home, the commission would be around $34,000. This is the sum of the commission on the first $100K of $3,500 and the commission on the remaining portion of $13,500. This commission will be typically split between the Seller and Buyer agents. The same Agent cannot represent both a Buyer & a Seller in one transaction.
Mortgage-Related Fees: Discharge and Prepayment Selling a home with an existing mortgage involves mortgage discharge fees, which can reach up to $700. Additionally, check for mortgage prepayment penalties, usually around 3 months of interest on your outstanding balance. Transferring your mortgage (Porting) to a new home might help you avoid these penalties.
Tax Considerations: Capital Gains Tax If you’ve made a profit on the sale, be prepared for capital gains tax. Investors may be subject to a 50% tax on their capital gain, but selling your primary residence usually qualifies for a principal residence exemption in Canada.
Preparing Your Home: Maintenance, and Repairs Consider professional cleaning and repairs, with costs potentially exceeding $1,000. Prioritize repairs that can increase your home’s value. Consult a Realtor for renovations & repairs suggestions to increase value for prospective Buyers.
Moving Expenses Whether hiring professionals or opting for a DIY move, budget for moving truck costs. Local moves typically range from $1,000 to $3,000, depending on your home’s size, while cross-country moves can reach $6,000 to $20,000, depending on the distance.
Government Mandates: Property Transfer Tax In British Columbia, property transfer taxes are the responsibility of the home Buyer. If you’re selling and purchasing a new home, budget for this tax, which can be a significant expense, such as $14,000 for an $800,000 home, as an example.
In summary, understanding the comprehensive costs associated with selling your home allows you to estimate expenses accurately and plan accordingly. Keep in mind that investing in your property can lead to a more profitable sale in the long run.
When homeowners in Vancouver decide to sell their property, it’s crucial to be aware of the potential implications of capital gains tax. In Canada, the sale of a residential property may be subject to this tax unless the property qualifies as the homeowner’s principal residence. Generally, the capital gains tax is applied to 50% of the profits obtained from selling an asset at a profit.
Defining a principal residence, however, can be somewhat ambiguous according to the Canada Revenue Agency (CRA), and meeting the criteria for the principal residence tax exemption involves several considerations.
THE PRINCIPAL RESIDENCE TAX EXEMPTION
The CRA mandates all taxpayers to report capital gains on property sales in their annual taxes. Yet, an exception is made for properties deemed as a principal residence.
Capital gains taxes are imposed on real estate investors who aim to profit from property sales, including house flippers and those who buy properties for rental purposes. Currently, the capital gains tax rate in Canada is set at 50% of realized capital gains.
For instance, if you invest in a $300,000 home and sell it for $350,000, resulting in a $50,000 gain, only $25,000 (half of the gain) is added to your taxable income for that year.
The principal residence tax exemption can significantly reduce the taxes payable when selling an investment property.
HOW THE CRA DETERMINES PRINCIPAL RESIDENCE
A principal residence is a property primarily used by the owner for personal living, even if occasionally rented out or sold for profit. The CRA does not specify a minimum number of days required for a property to qualify as a principal residence in any given year.
While full-time residence is not mandatory, homeowners may need to prove their physical presence in the property during the years designated as principal residence.
When claiming the principal residence tax exemption after selling a home, it’s advisable to have supporting evidence, especially if the CRA decides to audit the claim.
If the CRA investigates a principal residence exemption claim, they assess each case individually, considering factors such as utility bills, rental days, days spent living in the property, real estate transaction history, capital gains, rental income, and other sources of income.
CAN I RENT OUT MY PRINCIPAL RESIDENCE?
Surprisingly, homeowners can rent out their principal residence and still qualify for the principal residence exemption. However, eligibility depends on the number of days the property is rented out within a given year.
For instance, renting out a home on platforms like Airbnb while on vacation might still allow you to claim the principal residence exemption. However, if the property is primarily rented to long-term tenants, you may not qualify for the exemption in that year.
HOW MANY PRINCIPAL RESIDENCES CAN YOU HAVE?
Since 1982, the CRA has limited taxpayers to claiming only one principal residence per tax year, even if they own multiple properties.
THE CRA PRINCIPAL RESIDENCE CRACKDOWN
While the principal residence tax exemption serves as a great incentive for Canadians investing in real estate, not everyone accurately reports the sale of their homes.
The CRA may scrutinize properties sold under the guise of a principal residence and impose capital gains tax if there’s reason to suspect it was an investment property. This scrutiny can occur even after previously receiving a principal residence exemption. Therefore, homeowners must ensure the accuracy and transparency of their property sale reporting to avoid potential tax implications.
In conclusion, understanding the intricacies of capital gains tax is crucial for anyone considering the sale of their home at some point in the future. Please note that we are not accountants nor tax advisors. If you seek professional advice tailored to your specific situation, we’re happy to connect you with our vast network of experts who can provide the guidance you need.
Embarking on the journey of buying a new home in Vancouver is an exciting venture, but it comes with more than just the purchase price. Closing costs in British Columbia typically range from 2% to 4% of the property value, making them a crucial consideration in your home-buying process.
Closing costs encompass a variety of fees and expenses that go beyond the initial purchase amount. To ensure a smooth transition during the property title transfer, it’s essential to calculate and include these additional costs in your budget from the beginning.
Buying real estate involves a complex process that engages various stakeholders, including government entities, lending institutions, lawyers, real estate agents, insurance companies, and inspection professionals. Recognizing the significance of this support system is vital for a seamless home buying experience.
Closing costs, as defined in the real estate context, encompass all fees associated with acquiring a property and settling into your new home. This excludes the actual purchase price, focusing on the additional expenses involved in the process. While some costs are anticipated, such as moving and utility setup, others, especially those related to real estate transactions, require a closer examination.
Beyond the mandatory closing costs, you might opt for a pre-purchase home inspection to ensure a clear understanding of the property’s condition before finalizing the Contract of Purchase and Sale. In British Columbia, the average cost for a home inspection is approximately $500, varying depending on the property type.
Delving into the specifics of closing costs reveals various elements related to BC mortgage and real estate financing. Lending institutions often require certain documents and insurance to secure their investment in your new home. Key components include:
Property Appraisal: This independent assessment of the property’s fair market value, typically starting at around $350.
Land Survey Certificate: Confirming the property’s boundaries and house placement, with an average cost of $500.
House Insurance: A requirement for obtaining a mortgage, with yearly premiums starting at $1,200.
Title Insurance: Protecting against unforeseen costs related to property title, with a typical cost of $225 for properties under $1,000,000.
Mortgage Default Insurance: Required for high-ratio mortgages, with costs ranging from 2.8% to 4% of the total mortgage amount (*required if your Downpayment is less than 20%).
Payout Penalty Fees: Variable fees if you have an existing mortgage.
Estoppel Certificate: A document verifying strata financial specifics, typically costing $100.
While some of these elements may be variable and dependent on your lending institution, understanding them is crucial in navigating the real estate landscape effectively. Working with a Mortgage Specialist and securing a pre-approved mortgage can provide clarity on your lender’s requirements.
Legal Fees
Moving into the legal realm, your lawyer plays a pivotal role from offer acceptance to completion. Legal fees for transferring property title and ownership generally start at $1,200 to $1,400, with additional costs such as disbursements and adjustment fees depending on your transaction’s complexity.
Property Transfer Tax
One of the most significant closing costs is the Property Transfer Tax, based on the fair market value of your new home. For instance, a $750,000 property would incur a total Property Transfer Tax of $13,000.
General Property Transfer Tax is broken down as follows: • 1% of property value up to and including $200,000 • 2% of property value greater than $200,000 up to and including $2,000,000 • 3% of property value greater than $2,000,000 For example, if the house you are buying is valued at $750,000, the total Property Transfer Tax costs amount to $13,000. • $2,000 for the first $200,000 • $11,000 for the remaining $550,000 • $13,000 Total Property Transfer Tax
If you are a first-time home buyer in BC, purchasing a newly built home or transferring property title between family members, you may qualify for a transfer tax exemption or reduction. More on BC Property Transfer Tax, exemptions and calculations here: British Columbia Property Transfer Tax.
Buying into a New Construction
For those buying new homes or extensively renovated properties, the Goods and Services Tax (GST) at 5% of the property’s fair market value is a consideration. However, rebates may be available, and understanding the process is crucial.
The Government of Canada offers partial GST rebates that you may be eligible for. Learn more about Canadian rebate requirements here: GST/HST Housing Rebate.
Summary
In summary, while closing costs in British Columbia can vary based on numerous factors, a general estimate ranges from 2% to 4% of your property value. For a $750,000 home, this translates to $15,000 to $30,000, with Property Transfer Tax being a significant contributor. Navigating these costs with the guidance of experienced real estate experts and mortgage specialists can ensure a positive, productive, and seamless home buying experience in beautiful British Columbia.
Are you dreaming of owning a home in beautiful Vancouver but struggling to secure a mortgage through traditional lenders? Don’t despair! There are still viable options available to make your homeownership dreams a reality. Alternative and private lenders offer innovative solutions for individuals who may not meet the stringent criteria of traditional banks, monoline lenders, or credit unions. In this blog post, we’ll explore these alternatives and delve into the key factors that can help you qualify for a mortgage in this stunning coastal city.
Alternative mortgage lenders, often referred to as B lenders, provide a more flexible approach to mortgage qualification. They are known for accommodating lower credit scores, offering greater flexibility for self-employed individuals, and allowing for higher qualifying ratios compared to their traditional counterparts. If you’ve faced rejection from traditional banks, B lenders could be your saving grace. However, it’s important to note that interest rates with B lenders are typically higher, and there may be lending fees involved. Still, for many Vancouverites, the flexibility offered by B lenders makes homeownership attainable, even when traditional routes seem out of reach.
The rate you’re offered will depend on several crucial factors, including the type of property you’re interested in (house, townhouse, or condo), the specific area in Vancouver, the loan-to-value ratio (the percentage of the total mortgage versus the property value), and your credit score. By understanding these factors and working with a knowledgeable mortgage professional, you can navigate the private lending landscape more effectively.
Navigating the mortgage market in Vancouver may seem daunting, but remember that there are alternative and private lenders eager to help you achieve your homeownership goals. When exploring these options, it’s crucial to work with a reputable mortgage broker who can guide you through the process, ensuring you secure the best terms possible. With the flexibility and innovative approaches offered by these lenders, your dream of owning a home in Vancouver may be closer than you think. Don’t hesitate to reach out to a local mortgage expert (I’d be happy to provide recommendations) who can provide personalized advice and support as you embark on this exciting journey to homeownership in one of Canada’s most desirable cities.
Whether you’re a first-time buyer or a seasoned investor, it’s crucial to have a comprehensive understanding of the financial aspects associated with buying a property. In addition to the purchase price, there are several costs involved in the home buying process that you need to be aware of. In this blog post, I will break down these expenses, providing you with valuable insights and accurate figures to help you plan your budget effectively.
Property Transfer Tax (PTT)
When acquiring real estate in British Columbia, you are required to pay the Property Transfer Tax (PTT). This provincial tax is calculated as a percentage of the property’s purchase price & would be the biggest expense on top of the purchase price.
The rate is 1% on the first $200,000, 2% on the portion of the fair market value greater than $200,000 and up to and including $2 million, and 3% on the portion of the fair market value greater than $2 million.
Home Inspection
Before finalizing your purchase, it’s highly recommended to invest in a professional home inspection. This crucial step ensures that you are fully aware of any potential issues with the property and allows you to make an informed decision. Home inspection costs typically range from $350 to $1,000, depending on the size and complexity of the property.
Legal Fees
Engaging the services of a real estate lawyer or notary public is essential to ensure a smooth transaction. These professionals handle the legal aspects of the purchase, including document preparation, title searches, and registration. Legal fees can range from $1,000 to $3,000, depending on the complexity of the transaction.
Mortgage Default Insurance
If your down payment is less than 20% of the purchase price, you will likely need to obtain mortgage default insurance. The cost of this insurance depends on the size of your downpayment and can range from 0.6% to 4.50% of the mortgage amount.
Home Insurance
Securing home insurance is necessary to protect your investment. The cost of insurance varies depending on factors such as the property’s location, age and value. It’s advisable to obtain quotes from different insurance providers to find the best coverage at a competitive rate. Typically, home insurance can range from $500 to $2,000 per year.
Moving Costs
Don’t overlook the expenses associated with moving. Whether you hire professional movers or handle the move yourself, there will be costs involved, including packing materials, truck rentals and labor. The specific costs depend on the distance of the move and the volume of your belongings. On average, moving costs can range from $500 to $3,000 or more.
Property Tax Adjustments
When purchasing a property, you will need to account for property tax adjustments. This adjustment ensures that you pay the property taxes for the period during which you will be the owner. The amount owed varies depending on the time of year and the property’s assessed value.
Strata or Condo Fees
If you’re buying a strata or condo property, monthly maintenance fees will apply. These fees cover shared expenses such as building maintenance, landscaping and amenities. It’s crucial to review the strata or condo bylaws to understand the fee structure and factor them into your monthly budget. The fees can range from $200 to $800 or more per month, depending on the property size, building condition and its amenities.
By considering these various costs associated with buying a home, you’ll be better equipped to plan your budget effectively and avoid any unexpected financial surprises during the process. Please contact me, I’d be happy to guide you through the process and provide accurate estimates based on your specific situation.
Purchasing your first home is an exciting milestone in life. However, navigating the real estate market can be a daunting task, especially for first-time buyers. I understand the importance of providing valuable information and guidance to my clients. In this blog post, I will walk you through the essential steps and key considerations for becoming a first-time home buyer in Canada.
Understanding the Market The Canadian real estate market is diverse and dynamic, varying from region to region. Familiarize yourself with the current market conditions in your desired location, including average home prices, inventory levels, and any local factors influencing the market. This knowledge will help you set realistic expectations and make informed decisions. Good start: Real Estate Board of Greater Vancouver Monthly Sales Update
Financial Readiness Assessing your financial readiness is crucial before embarking on the home-buying journey. Start by evaluating your credit score and managing any outstanding debts. It’s also advisable to save for a down payment, as it can significantly impact your mortgage terms. Explore various mortgage options and consult with a financial advisor or mortgage professional to determine your budget and secure pre-approval. Contact me for mortgage professionals recommendations
Government Programs and Incentives As a first-time home buyer in Canada, you may be eligible for several government programs and incentives aimed at making homeownership more accessible. Research programs like the Home Buyers’ Plan (HBP), First Home Savings Account (FHSA) and the First-Time Home Buyer Incentive (FTHBI), which can provide financial assistance or tax benefits. Understanding these programs can help you maximize your purchasing power.
Partnering with a Realtor Working with an experienced real estate professional can make the home-buying process smoother and more efficient. A Realtor will guide you through the entire journey, from searching for suitable properties to negotiating offers and completing paperwork. Our expertise and market knowledge can prove invaluable in finding your dream home at the right price.
Identifying Priorities and Needs Before starting your property search, determine your priorities and needs. Consider factors such as location, proximity to amenities, transportation options and future growth potential. Creating a list of must-haves and nice-to-haves will streamline your search and ensure you find a home that aligns with your lifestyle and long-term goals.
Property Research and Due Diligence Once you start viewing potential homes, conduct thorough research and due diligence. Scrutinize property listings, visit open houses, and ask your Realtor for detailed information about the properties you’re interested in. Consider factors such as property condition, age, maintenance requirements, and potential resale value. Don’t hesitate to ask questions and seek professional inspections to make an informed decision.
Making an Offer and Closing the Deal When you find the perfect home, I will assist you in preparing a competitive offer. I will negotiate on your behalf and guide you through the legal and financial aspects of the transaction. It’s important to work closely and have clear communication with your realtor, lawyer, and mortgage professional to ensure a smooth closing process and that all necessary documentation is in order.
Becoming a first-time home buyer can seem overwhelming, but with the right knowledge and support, it’s an achievable goal. I’m committed to empowering my clients with the information and guidance they need to make confident decisions. By understanding the market, assessing your finances, leveraging government programs, partnering with a Realtor you are comfortable working with, and conducting thorough research, you’ll be well on your way to achieving your dream of homeownership.
Contact me today to begin your exciting journey towards owning your first home.
When sellers prepare their house for the market, they’re usually happy to share everything they’ve done to make it more attractive to buyers — new roof, freshly painted trim, and new fixtures in the bathroom and kitchen. However, they don’t often discuss minor details of things they need to do before selling that can cost them thousands of dollars if prospective buyers catch on before closing the deal.
Here are some things sellers let slip when they prep their house for the market. Don’t let this happen to you,
1. Take Care of Clutter
Even veteran sellers make the common mistake of forgetting to declutter when they prep their homes for sale.
Many homes have items and belongings (not to mention dust bunnies) hidden in closets, attics, and basements. So before you put your house on the market, it’s essential to comb through every nook and cranny to remove anything that can make potential buyers walk away.
Ask yourself: is there any item that might make buyers uneasy or draw attention to a repair? If so, get rid of it. Your real estate agent will also be able to give you a checklist of what needs to be done before going live with your listing. This should include some must-dos like cleaning out gutters, ensuring all appliances are working correctly, and making necessary repairs.
If your closets, cabinets, and drawers are stuffed full of old toys, unused gadgets, and clothes you haven’t worn in years, it’s time to get rid of them! One great way to do so is by holding a yard sale or donating your belongings. Prospective home buyers want to visualize themselves living in a new clean environment, so make sure you declutter before letting them in.
2. Fix Small Defects Before Listing
While prospective buyers can be forgiving of minor flaws, some defects, such as a leaky faucet or a cracked window, can scare them off. However, research suggests fixing minor defects before listing your home is worth it.
The following problems are particularly likely to push buyers away:
Drafty windows and doors
Leaks in bathrooms and kitchens
Squeaky floors
Dirty carpets or rugs
Clean your windows inside and out. Cleaning your windows might seem like a simple task, but it’s one you shouldn’t overlook. This seemingly small but essential detail can help your house sell faster and for more money. You might be tempted to clean only from inside, but don’t. However, this may make it look like no one lives there (and you might have to deal with people stopping by unexpectedly).
Cleaning from both sides will make your house stand out in photos and attract buyers who are looking specifically for homes with clean windows on both sides. Consider it an investment; cleaning your windows can pay off big-time if you decide to sell.
These problems are easy to overlook in your daily life but scream neglect to buyers who imagine living with them for years. Spending money on repairs now is an investment that should pay off when you sell later.
3. Have Buyers in Mind When Decorating
It may feel natural to put your needs first when decorating. After all, it’s your home. However, prospective buyers do not want to live in a home that doesn’t reflect their taste.
It is easier and much more cost-effective to purchase new furnishings when they are needed. After all, you don’t have to worry about selling these items later. In addition, it is essential to consider who will be looking at or walking through your home during open houses or showings.
Buyers may include single people without children and families with young children. They may also include older adults and perhaps even someone with physical limitations which could have difficulty with stairs or bathrooms without grab bars. So keep the average buyer in mind when redecorating your house for the market.
4. Be Honest with Your Agent
It’s essential to be honest with your real estate agent about any repairs or remodelling plans for your home — no need to try fixing it yourself. Instead, call them and fill them in if you think of something after they leave. This will keep you on track with your timeline, reduce repair costs and help avoid costly re-dos. Not sure where to start? Your real estate agent can help give suggestions if needed!
5. Improve Curb Appeal
Curb appeal often sets one home apart from another, especially when selling. So if you’re putting your house on the market, be sure to take care of all of these exterior details.
Nothing will add curb appeal like new landscaping. However, this is also an excellent time to think about trees and shrubs that will positively impact your home’s air quality and water usage.
Properly placed plants can also help block noise from neighbours and busy streets. Trees are an investment in your property’s long-term value and can keep going strong for decades if properly maintained. Talk with your local nursery about which varieties might work best for you.
Trust us, a little sweat and elbow grease will make your home look its best. Better curb appeal means more buyers!
It may be tempting to hold back when showing your home because you don’t want to leave anything to chance, but ultimately, buyers must see all of your houses. You have something valuable that they want, so make sure you help them in every way possible to acquire it by preparing your home thoroughly.
Selling a home is a stressful business. It’s probably the single largest transaction you’ll make in a lifetime. Add in the fear of a downturn, a possible recession and market uncertainty and you’ve got a recipe for anxiety.
These are the moments when armchair real estate experts will tell you to hold off selling. Unfortunately, many people can’t just sit around and wait for market conditions to change. New jobs, changing financial circumstances and other life events won’t allow it. Thankfully, selling a home during uncertain market conditions or during a buyer’s market doesn’t necessarily equate to doom and gloom. There are time-tested strategies sellers can use to mitigate the downside of a slow market.
Here are eight essential steps for selling a home in a buyer’s market.
Step #1: Analyze Current Market Dynamics and Trends
Sellers shouldn’t be relying on national averages. Home sellers need to go beyond general national statistics and drill down into precisely what is selling in your specific geographic location.
“While starting with an overview of Canada’s housing market is nice, it doesn’t give you the granular detail required to make educated decisions,” explains Mustafa Abbasi, President of Zolo Realty. “To get a true picture of what is happening in your neighbourhood and in your city you need more detailed information. You want to know what property types are selling, how much more will an extra bedroom or bathroom will get you, and whether or not buyers are more interested in a garage or an in-law suite.”
In short, you need insightful, relevant data before sticking a “For Sale” sign on your home.
Step #2: Get a Killer Agent on Your Side
Want to sell your home in a down market? Then you’ll need to pick the right agent.
Ask friends and neighbours for references and interview at least three agents, if not more, before making a selection. Ask each agent specifically what they will do to market your home, who will be working with you (some high profile agents get your business and then ask a junior associate to do all the work), and how many clients they are currently working with.
Avoid agents who promise a fast sale or guarantee an above market price for your home. They can’t. It’s just a cheap ploy to get your listing.
In the end, you want a professional that is dedicated to their career and puts the time and energy into becoming an expert. This doesn’t mean you need an industry veteran; sometimes agents earlier in their career are better, as they are willing to hustle.
No matter who you shortlist, be sure you feel comfortable with working with them and you are in tune with their communication style. There’s nothing worse than talking and deciding on massive sums with someone you feel isn’t listening to you!
Step #3: Price It Right
Perhaps the single most important factor when selling a home in a down market is to list it at the right price. Price it too high and your home will sit on the market, becoming a comparison show-home that helps sell other properties on the market.
To set the right price, sellers need exact information on properties that recently sold, the similarities and differences in those properties to their home and the market conditions for their community and property type.
For sellers choosing the do-it-yourself option (known as For-Sale-By-Owner), you can find sold information on many real estate brokerage sites.
If you opt to work with a Realtor, ask this professional for a comprehensive Competitive Market Analysis (CMA). Most agents will limit this analysis to no more than six or so properties — primarily because too much information can be overwhelming for most people. If, however, you prefer more info rather than less then don’t be afraid to ask for it. Good agents are only too happy to help engaged and motivated sellers.
Step #4: Put On Your Best Face
A first impression is often a lasting one and, as sellers, the same applies to how buyers first see your home. You want to really leave an impression; remind the buyer what they could get if they are willing to take the plunge and buy.
While some sellers will be ready to go — with manicured yards, up-to-date home maintenance and much-needed updates — others will need to consider spending a bit of time and money investing in beautifying the home before listing it for sale. While some updates are sunk costs, typically the money spent on creating curb appeal is a good investment.
Consider your property’s gardens and lawns, as well as the hardscaping (these are patios and stone walkways). Spend an afternoon or pay a company to power wash your home and pathways (as well as the driveway) and consider painting the exterior if this job hasn’t been done in over a decade.
When it comes to inside the home, don’t bother spending large sums on major renovations (unless you plan to gut and redo the entire home to the current standard of home buyer desires). Instead, consider spending on strategic updates: update old-fashioned light fixtures, wall plates and drawer knobs to more contemporary selections. Replace carpets (or, at the very least, steam clean them to within an inch of their life) or pay to refinish rough or stained hardwood floors. Once done, spend time (or pay professionals) to really make your place sparkle and shine. Don’t forget to remove the cat box from the kitchen. While pets are cute, too many would-be buyers can get turned off when there is evidence of a pet (such as food or smells).
Step #5: Declutter and Depersonalize
Want a cheap way to add value to your home? Get out the boxes and start packing. According to professional organizers, each box of clutter that’s packed away before listing your home for sale can add about $500 to the value of your home. Pack 10 boxes and you add approximately $5,000 to the sale price of your home. Why? Because many prospective buyers find it tough to look past the clutter and personalized memorabilia. Rather than focusing on how much light the family room gets, these buyers are drawn to the family photos, spoon collection and the pile of tax papers on the coffee table.
So, remove your personal memorabilia so that a potential buyer can easily imagine living in your space. While you’re at it, declutter your home by taking away unnecessary furniture and nick-nacks (these items can make your home look smaller than it is). Box it all up and pack it away. Remember, if you want to sell your home in a buyer’s market, you need to convince the buyer that your home offers the best value on the block.
Step #6: A Picture Is Worth a Thousand Words
Most buyers begin their search online — and survey after survey shows that buyers consider photos as the single most important feature that drives them to book an appointment to view a home.
While hiring a professional photographer is ideal (they’ll know when to turn on the lights, when to draw the curtains and what angle is the best for each room), it isn’t 100% necessary. Any good camera (either digital or on a smartphone) can take great shots as long as you follow these simple rules:
Always turn on all the lights before taking the shot (even it it’s daylight outside) Don’t bother taking shots of standard rooms (if your bathroom doesn’t photograph well, then don’t bother show it) Remove all hints of pets Clean and organize all clutter, including removing all appliances from the kitchen and bathroom counters For outside shots, consider taking the pictures just before dusk, when most photographers would agree that outside light is perfect for contrasting your picture subject (in this case, your home) In the end, you want to make your home look like a Hollywood star. No joke.
Step #7: Add Financial Incentives
In slow housing markets, sellers may need to put some financial skin in the game in order to close the deal. This doesn’t always mean knocking down your asking price. Instead, consider other financial incentives that could sweeten the deal for would-be buyers. For instance, offer to pay all closing costs. While this may mean a few thousand out of your pocket, it could mean a done deal without reducing your asking price. Other options include paying for a mover, providing a year of Netflix or cable TV services or throwing in a flat screen TV.
The idea is to nudge the on-the-fence buyers into making a deal.
Step #8: Bird in the Hand
In a buyer’s market, you have to be prudent and quick. This means offering counters to all offers, even if the buyer offered a low-ball bid.
Remember, most buyer traffic will come in the first several weeks of a listing, so it’s never a good idea to ignore a bid even if it does feel insulting.
While a low-ball offer may hurt, emotionally, it’s still a clear indicator that a buyer is interested in the property. Keep that interest going until you can help them see that your price and terms are reasonable (assuming you priced the property competitively in the first place).
Another reason is that an offer in-hand can entice other buyers to move quicker. No one wants to feel like they lost out, so adding a bit of urgency can prompt buyers that are on the fence to act.
Since a formal counter-offer can legally bind you to negotiate with just one seller, consider talking with your agent about how to keep your options open. Perhaps your agent can have informal chats with the buyer’s agent about possible terms and conditions that both parties will agree to; or you could add in a clause to a formal counter-offer that frees you up to negotiate with other possible buyers, as their offers come in.
Either way, don’t ignore an offer based on a hope that something better will come in. Instead, be proactive and be smart and negotiate your way to a better sale price.